Microsoft Outlook

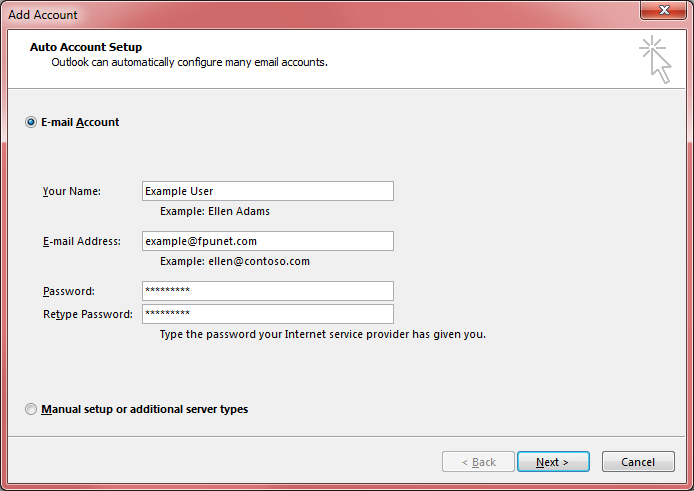
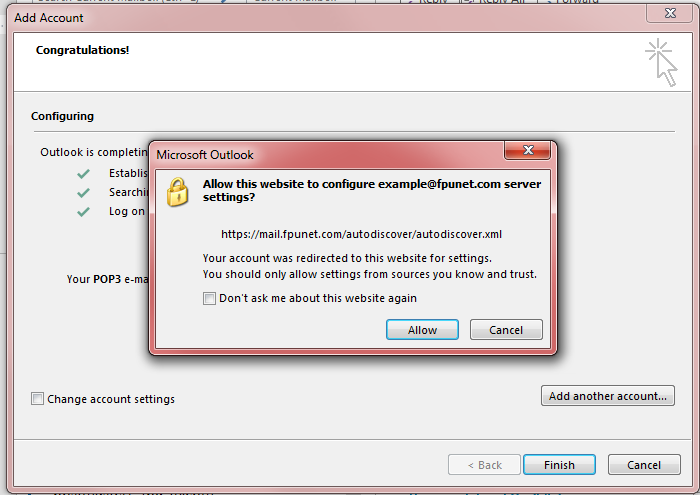
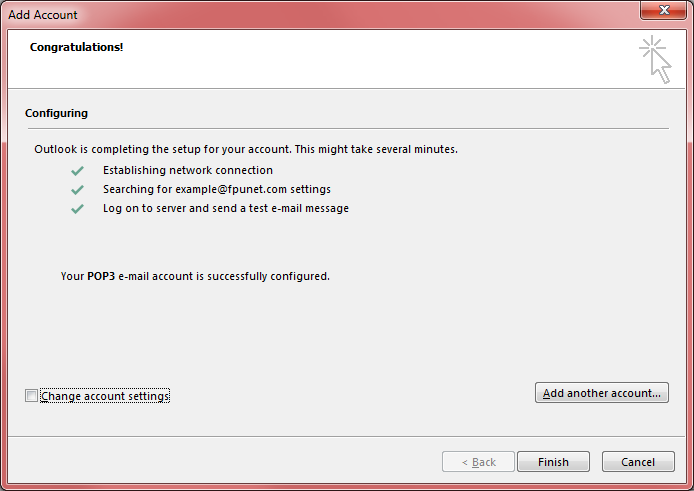
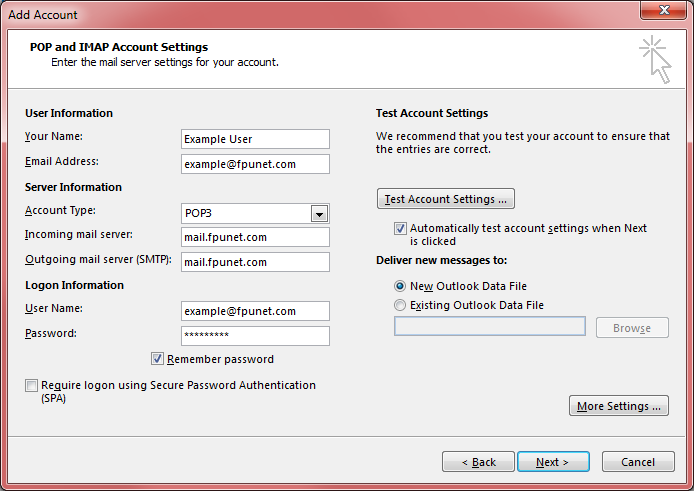
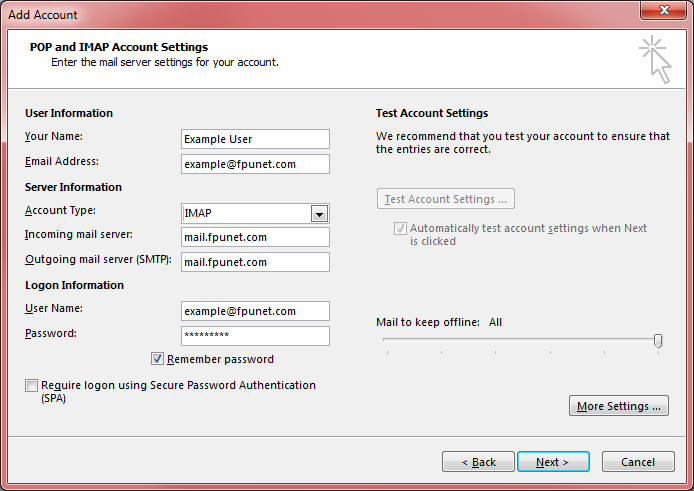
Outlook 2007 and later can automatically setup your email account or you may setup the account manually. If you choose to automatically setup your account, the account will be setup as a POP3 account. Note these screens are specific to 2010-2016, earlier versions are a bit different in appearance but the method is the same.

First you may have to click on the File button and select [+ Add Account]. If you have never run outlook before, it may simply ask you to setup automatically.
Outlook001
The next screen will allow you to select automatic or manual. If you are doing your setup automatically, fill in your information and click [Next >]. If you want manual, select the dot for manual setup and skip down to the manual setup section.

Note: 'Your Name' is the part of the email address that is not the actual address. When you get an email from "Bob Smith <bob@example.com>" his 'Your Name' field is Bob Smith. 
Outlook003
The account wizard will now automatically access our website and get the settings needed to setup Outlook. This may take a minute. You will be asked to allow our website at https://mail.fpunet.com/autodiscover/autodiscover.xml to configure your settings. Click [Allow].

If it is unable to connect and get the info it needs, or fails the test after setting itself up, the most common reasons we see are:
  • A misspelled email address.
  • Wrong Passwords.
  • And finally, something causing your computer to not be able to connect to the internet. 
Outlook004
Now simply click [Finish]
Outlook005
You are now done. The following instructions are for manual setup.

If instead you choose to setup your account manually, after clicking next you will need to choose a service ype. Pick "POP or IMAP" then click [Next >].
Outlook006
You now have a choice of setting up your account as POP or IMAP. We will deal with POP first, and it is what is selected automatically. If you are going to use IMAP, skip down to the IMAP section.

Fill in the information on the Account Settings page:
  • Your Name:
  • Email Address:
  • Account type: (Leave the pulldown on 'POP3')
  • Incoming mail server: mail.fpunet.com
  • Outgoing mail server: mail.fpunet.com
  • Username: Your full email address
  • Password: Your email account password
'Remember Password' should already be checked. Do not click on [Next >] yet. Instead, click on [More Settings...]
Outlook007
Once you hit the more settings button, a window will pop up with several tabs across the top. The General tab is mainly for personalization, you can safely ignore it. Click on the {Outgoing Server} tab, then place a checkmark next to 'My outgoing server (SMTP) requires authentication'. Leave the dot next to 'Use same settings as my incoming mail server', then click on the {Advanced} tab.
Outlook008 1
After clicking the {Advanced} tab, you will see a list of various settings. Several need to be changed, and I will go through them here.
  • Place a check mark in the box next to 'This server requires an encrypted connection (SSL)', the number in the box for the incoming server (POP3) should automatically change from 110 to 995.
  • Under 'Use the following type of encrypted connection:' pull down the menu and select TLS.
  • In the box next to Outgoing server (SMTP): the number will be '25'. Change it to '587'
You can now click [OK].
Outlook009
Now you can click [Next >], after which it will test your connection.
Outlook007
Assuming everything is setup properly, you can click [Close]. If the connection fails, the most common problems we see are:
  • Mispelled email address/usernames.
  • Mispelled server names.
  • Wrong Passwords.
  • And finally, something causing your computer to not be able to connect to the internet. 
Outlook010
Now you can click [Finish] and start using your email.
Outlook011
For setting up your account as an IMAP account, do this:
Fill in the information on the Account Settings page:
  • Your Name:
  • Email Address:
  • Account type: (Pulldown the menu that says 'POP3' and select 'IMAP')
  • Incoming mail server: mail.fpunet.com
  • Outgoing mail server: mail.fpunet.com
  • Username: Your full email address
  • Password: Your email account password
'Remember Password' should already be checked. Do not click on [Next >] yet. Instead, click on [More Settings...]
Outlook012
Once you hit the more settings button, a window will pop up with several tabs across the top. The General tab is mainly for personalization, you can safely ignore it. Click on the {Outgoing Server} tab, then place a checkmark next to 'My outgoing server (SMTP) requires authentication'. Leave the dot next to 'Use same settings as my incoming mail server', then click on the {Advanced} tab.
Outlook008
After clicking the {Advanced} tab, you will see a list of various settings. Several need to be changed, and I will go through them here.
  • On the first line that says 'Use the following type of encrypted connection:', pull down the menu and select SSL. The number in the box for the incoming server (IMAP) should automatically change from 143 to 993
  • Under 'Use the following type of encrypted connection:' pull down the menu and select TLS.
  • In the box next to Outgoing server (SMTP): the number will be '25'. Change it to '587'
You can now click [OK].
Outlook013
Now you can click [Next >], after which it will test your connection.
Outlook012
Assuming everything is setup properly, you can click [Close]. If the connection fails, the most common problems we see are:
  • Misspelled email address/usernames.
  • Misspelled server names.
  • Wrong Passwords.
  • And finally, something causing your computer to not be able to connect to the internet. 
Outlook014
Now you can click [Finish] and start using your email.
Outlook011